
Polishing, firing & Finishing: a.k.a. Ultimate Disaster Occurs!
 After leaving my piece to dry from Friday night until Saturday afternoon, with a couple of bursts of the hairdryer too for help, I sanded down my piece, using a simple nail file. I was able to easily remove most of the imperfections and lumps and bumps - I spent a few hours on this section; picking it up, doing a few minutes until it looked "fine", then leaving it for a while, coming back to it, seeing all the new imperfections I hadnt noticed, refiling it... rinse and repeat. Like you would with an art piece, leave it and return several times, and hold it at arms length, honestly criticising it to try and make the best of your piece. :-)
To make sure it was truly dry I did not fire it until Sunday afternoon.

I fired my piece on my gas hob. As such, I purchased this handy metal net to rest my piece over the hob on. The smaller finer piece, is cut specially so you may bend it into a box shape (shown a few steps below), which means that if, for whatever reason your piece spits, or explodes (etc) its contained.

I filled a stainless steel bowl with some water to finish off cooling the piece (I dont know how important the stainless steel part is really, my instruction sheet specified it, so seeing as we had some in the cupboard I used it.... might try it without though).

Timing is important - I took off my watch so I could observe the time easier. I fired for a total of five minutes.

I switched on the hob, to find the hottest part of the steel net (which part glowed red), picked a red spot to put my piece on, then turned off the hob so I could safely lay my piece on it, with a pair of cheap tweezers I bought from Tescos the other day for the purpose. Very handy!

I laid on my piece, formed the little box from the smaller steel mesh as shown about and placed it over the piece, lighting the hob again after. Now, there are two things to note here; firstly, my piece looked rather unremarkable for the whole firing. No burning, spitting, glowing.... absolutely zilch. Did I do it right? Who knows. The piece shrunk by the recommended 10% so.. I can only hope so!
Secondly to note; the smell. Oh my god the smell. THE SMELL WAS HORRENDOUS...... Now, as it turns out this was *not* the fault of the silver clay, but rather the mother of pearl setting.. which as you can see below.... does not have a very high tolerance of temperature.

That is to say, it was totally, utterly destroyed. Such a shame.. Lucky that it was a cheap gem to buy, but its still a sad shame. It was so so beautiful. :-( Needless to say, that was unsalvageable. As you can also see, the silver shrunk so much it cracked noticeably. I'm not sure how to get around that..?? Maybe you have to use it in much thicker quaitities (I shall certainly try that..) to avoid this. So, a disaster all round, really.

Then one of the leaves fell off. Oh bother, was that the final straw! After leaving it to cool for the recommended 15 minutes, I dunked it in the bowl of water, and dried it off, before setting about to see if I could salvage it.
 Well beyond repair.
 Um.... really... REALLY... beyond repair. The shattering of the mother of pearl was actually quite pretty (the internal layers had retained normal pearlescent sheens) but unfortunately not suitable for me to use anymore...

Firstly, I took off the mother of pearl (it came away easily), and chipped away the raised border I had creates, as totally as I could.

Using the magical polishing cloth I bought, and also the steel toothbrush too, I furiously scrubbed and rubbed until my piece polished up (this is the front, you can see the remains of the border...). The nice matte silver finish was quite pretty (but I do wonder how to get it truly shiny..).
You can also see two fracture lines: as the piece was, let face it, ruined, I decided to test the strength of my piece. Disappointingly, it snapped under very little pressure from my hands, very brittle and fragile (again, must make thicker next time..). Glued it back together - bless super glue! It was to become my good friend during this most hard of rescue missions!! I actually quite like the fracture lines, nice addition of character...

This was the back of the piece, polished. Scrubbed up quite nice actually, very smooth finish. Quite liked this.

In the end, I cut a piece of copper sheet the same size and shape as the mother of pearl, and super glued it in place on the front of the cabochon. This became a two sided piece; this was the back, where I reattached the leaves. Simple, but nice, I think.

I didnt want to leave the front to be a mess though! I also couldnt leave it bare with just he copper sheet on it, as the remains of the border were quite ugly. So, I got out my super huge beading kit, and rifled through it to find something suitable to add on. In the end I went for small turquoise chips (again, glued on).
Overall I think the final pendant is *ok*, but obviously compared to the initial ambition, concept and ideas I had, its nothing in comparison. A disappointment really, but I'm glad I was able to salvage it to soemthing unique and useable (especially since theres about £7 of pure 99.9% silver in the piece....).
Overall, with regards the silver clay, there is obviously a LOT of room for improvement. I'm viewing this experience with mixed emotions.
On the one hand; I failed at something I experimented in, in essence. That incenses me to try harder, and succeed. I do not like to be beaten!! This is a puzzle I will endeavour to solve - at least until I run out of silverclay to work with!
On the other hand; this material is a veritable NIGHTMARE to work with, no shadow of a lie. This may be partly down to my own inexperience, but let face it, when the apparent *slow dry* clay seems to be totally dry within a minute or two of removing from the pack, and the *normal* (i.e. faster) dry clay seems like it will never flipping dry, theres some head scratching and panic on my part! I have learned the hard way never to fire stones/gems - you may lose them (and they may stink out your house in the process...). Don't do it kids, just don't do it!
In conclusion though, would I do it again? Definitely. Like I said, I don't like to be beaten! Its an intruiging material to work with, for sure. Give it a try if you can, but be prepared to lose your money if and when it goes wrong.. then again, maybe just don't make the mistakes I did! ;-)
Kind regards from a beginner,
Let me know how it goes,
Meg!
 After leaving my piece to dry from Friday night until Saturday afternoon, with a couple of bursts of the hairdryer too for help, I sanded down my piece, using a simple nail file. I was able to easily remove most of the imperfections and lumps and bumps - I spent a few hours on this section; picking it up, doing a few minutes until it looked "fine", then leaving it for a while, coming back to it, seeing all the new imperfections I hadnt noticed, refiling it... rinse and repeat. Like you would with an art piece, leave it and return several times, and hold it at arms length, honestly criticising it to try and make the best of your piece. :-)
To make sure it was truly dry I did not fire it until Sunday afternoon.

I fired my piece on my gas hob. As such, I purchased this handy metal net to rest my piece over the hob on. The smaller finer piece, is cut specially so you may bend it into a box shape (shown a few steps below), which means that if, for whatever reason your piece spits, or explodes (etc) its contained.
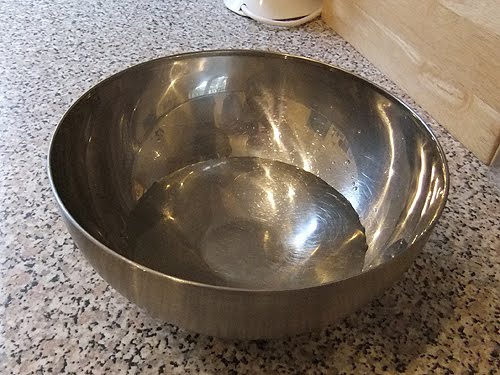
I filled a stainless steel bowl with some water to finish off cooling the piece (I dont know how important the stainless steel part is really, my instruction sheet specified it, so seeing as we had some in the cupboard I used it.... might try it without though).

Timing is important - I took off my watch so I could observe the time easier. I fired for a total of five minutes.

I switched on the hob, to find the hottest part of the steel net (which part glowed red), picked a red spot to put my piece on, then turned off the hob so I could safely lay my piece on it, with a pair of cheap tweezers I bought from Tescos the other day for the purpose. Very handy!

I laid on my piece, formed the little box from the smaller steel mesh as shown about and placed it over the piece, lighting the hob again after. Now, there are two things to note here; firstly, my piece looked rather unremarkable for the whole firing. No burning, spitting, glowing.... absolutely zilch. Did I do it right? Who knows. The piece shrunk by the recommended 10% so.. I can only hope so!
Secondly to note; the smell. Oh my god the smell. THE SMELL WAS HORRENDOUS...... Now, as it turns out this was *not* the fault of the silver clay, but rather the mother of pearl setting.. which as you can see below.... does not have a very high tolerance of temperature.

That is to say, it was totally, utterly destroyed. Such a shame.. Lucky that it was a cheap gem to buy, but its still a sad shame. It was so so beautiful. :-( Needless to say, that was unsalvageable. As you can also see, the silver shrunk so much it cracked noticeably. I'm not sure how to get around that..?? Maybe you have to use it in much thicker quaitities (I shall certainly try that..) to avoid this. So, a disaster all round, really.

Then one of the leaves fell off. Oh bother, was that the final straw! After leaving it to cool for the recommended 15 minutes, I dunked it in the bowl of water, and dried it off, before setting about to see if I could salvage it.
 Well beyond repair.
 Um.... really... REALLY... beyond repair. The shattering of the mother of pearl was actually quite pretty (the internal layers had retained normal pearlescent sheens) but unfortunately not suitable for me to use anymore...
Firstly, I took off the mother of pearl (it came away easily), and chipped away the raised border I had creates, as totally as I could.

Using the magical polishing cloth I bought, and also the steel toothbrush too, I furiously scrubbed and rubbed until my piece polished up (this is the front, you can see the remains of the border...). The nice matte silver finish was quite pretty (but I do wonder how to get it truly shiny..).
You can also see two fracture lines: as the piece was, let face it, ruined, I decided to test the strength of my piece. Disappointingly, it snapped under very little pressure from my hands, very brittle and fragile (again, must make thicker next time..). Glued it back together - bless super glue! It was to become my good friend during this most hard of rescue missions!! I actually quite like the fracture lines, nice addition of character...

This was the back of the piece, polished. Scrubbed up quite nice actually, very smooth finish. Quite liked this.

In the end, I cut a piece of copper sheet the same size and shape as the mother of pearl, and super glued it in place on the front of the cabochon. This became a two sided piece; this was the back, where I reattached the leaves. Simple, but nice, I think.

I didnt want to leave the front to be a mess though! I also couldnt leave it bare with just he copper sheet on it, as the remains of the border were quite ugly. So, I got out my super huge beading kit, and rifled through it to find something suitable to add on. In the end I went for small turquoise chips (again, glued on).
Overall I think the final pendant is *ok*, but obviously compared to the initial ambition, concept and ideas I had, its nothing in comparison. A disappointment really, but I'm glad I was able to salvage it to soemthing unique and useable (especially since theres about £7 of pure 99.9% silver in the piece....).
Overall, with regards the silver clay, there is obviously a LOT of room for improvement. I'm viewing this experience with mixed emotions.
On the one hand; I failed at something I experimented in, in essence. That incenses me to try harder, and succeed. I do not like to be beaten!! This is a puzzle I will endeavour to solve - at least until I run out of silverclay to work with!
On the other hand; this material is a veritable NIGHTMARE to work with, no shadow of a lie. This may be partly down to my own inexperience, but let face it, when the apparent *slow dry* clay seems to be totally dry within a minute or two of removing from the pack, and the *normal* (i.e. faster) dry clay seems like it will never flipping dry, theres some head scratching and panic on my part! I have learned the hard way never to fire stones/gems - you may lose them (and they may stink out your house in the process...). Don't do it kids, just don't do it!
In conclusion though, would I do it again? Definitely. Like I said, I don't like to be beaten! Its an intruiging material to work with, for sure. Give it a try if you can, but be prepared to lose your money if and when it goes wrong.. then again, maybe just don't make the mistakes I did! ;-)
Kind regards from a beginner,
Let me know how it goes,
Meg!


